WhatsApp Vonage
To make it easy for your consumers to make purchases and get answers to questions using WhatsApp, the messaging channel they already use every day, Druid authors can integrate AI Agents with WhatsApp. This way, customers will be able to start a conversation with your AI Agent in WhatsApp.
The Druid AI Platform provides the WhatsApp channel via the integration partner Vonage.
This section describes how to connect your AI Agent with your Vonage account.
Prerequisites
- You built and published an AI Agent.
- For Druid on premise deployments, make sure that you provide access to/from the necessary messaging endpoints as follows:
| Outbound | api.nexmo.com |
| Inbound |
DRUID.BotApp DRUID.BotApi |
Integration procedure
To integrate an AI Agent with your Vonage account, follow these steps:
Step 1. Get authentication details
Step 1.1. Log into your Vonage Dashboard
In your browser go to https://ui.idp.vonage.com. The Login page appears.
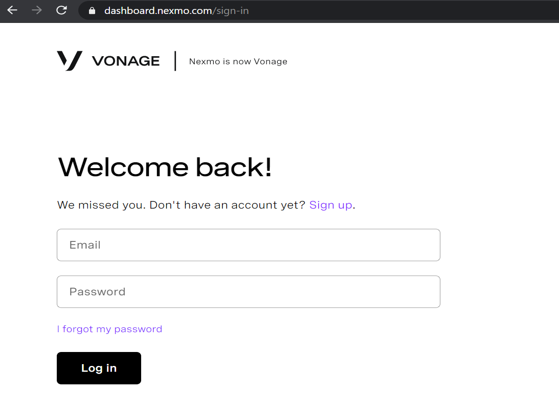
Enter your Vonage Dashboard credentials (email and password) and click Log in.
Step 1.2. Get API key and secret
When you create a Vonage account, an API key and secret will be created for you. To get these two values, in the Vonage Dashboard, from the BUILD & MANAGE menu, click API Settings.
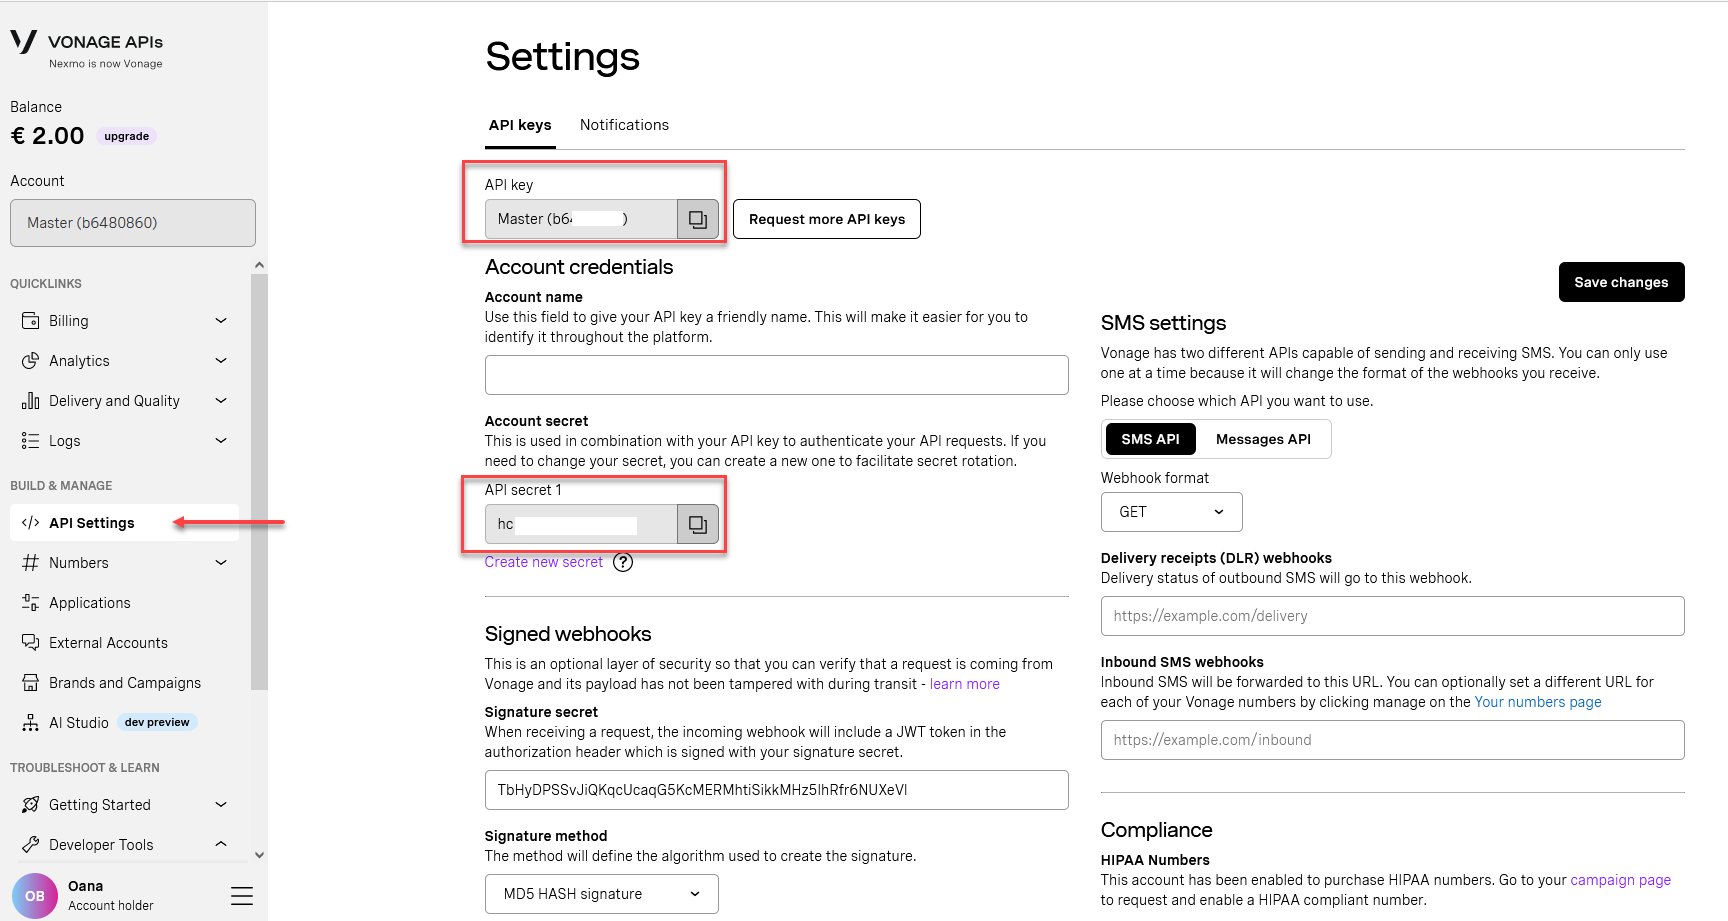
Write down or copy/paste in a document the API key and API secret, you will need them to activate the WhatsApp channel in Druid.
Step 1.3. Generate JWT token for WhatsApp PROD environment using WhatsApp Messages API version v1
To generate a JWT token, follow these steps:
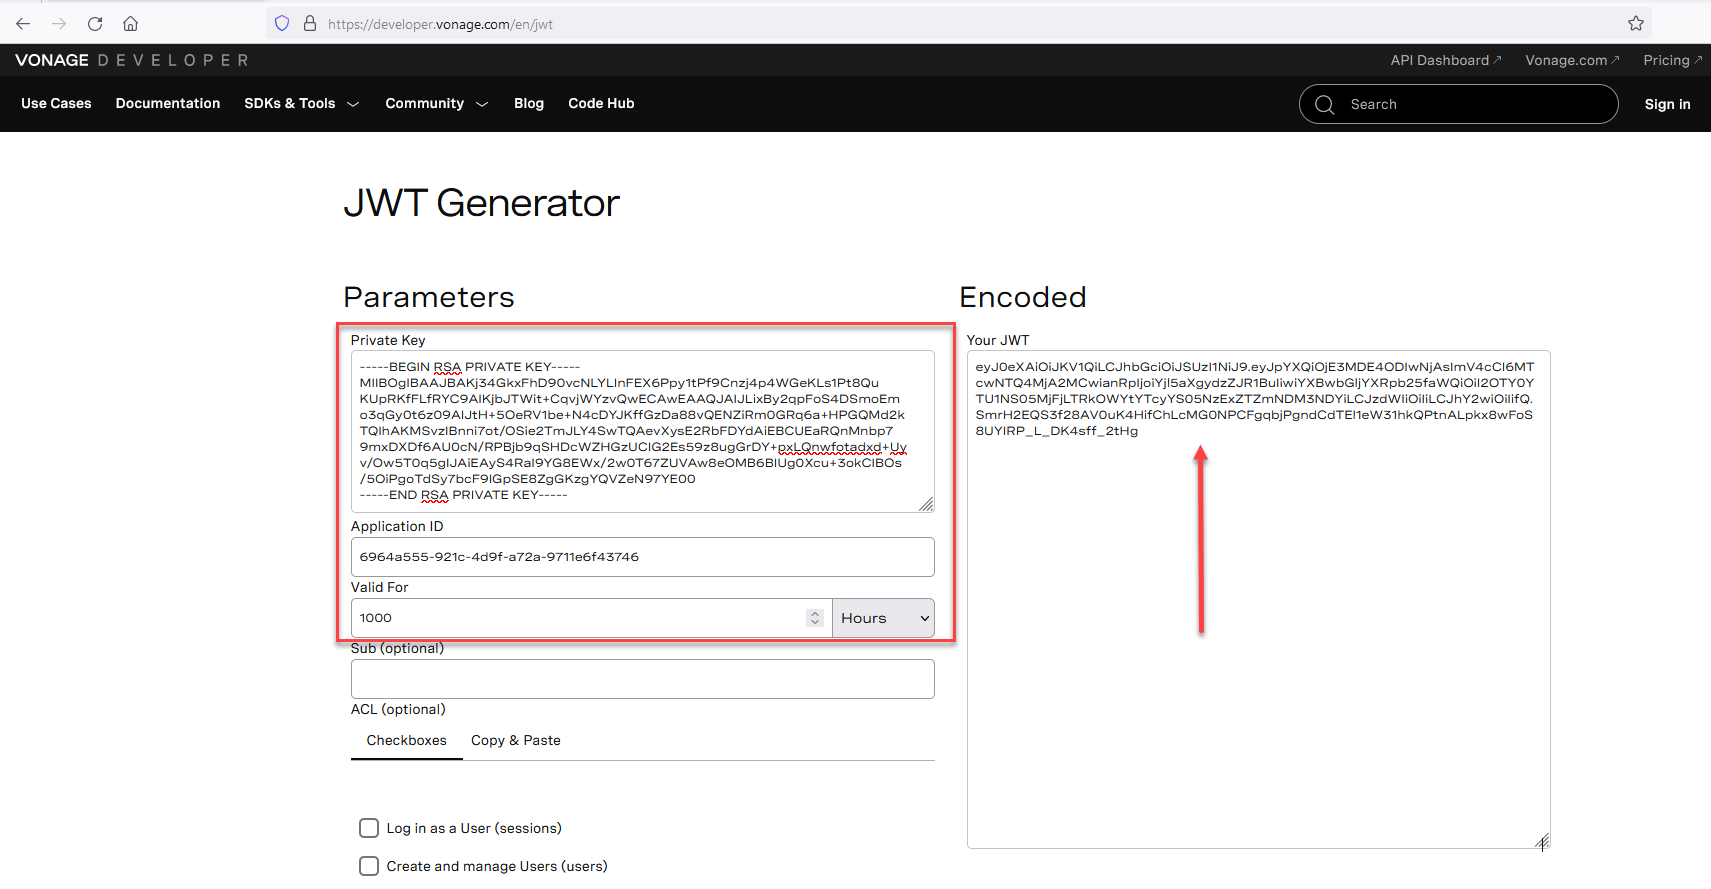
- Access https://developer.vonage.com/en/jwt.
- Provide the following parameters:
- Your application's private key (copy it from the downloaded file during application creation).
- The application_id.
- Valid For field: Enter or select the duration for which the JWT token will be valid.
Step 2. Activate the WhatsApp channel in Druid Portal
- In the Druid Portal go to your AI Agent settings.
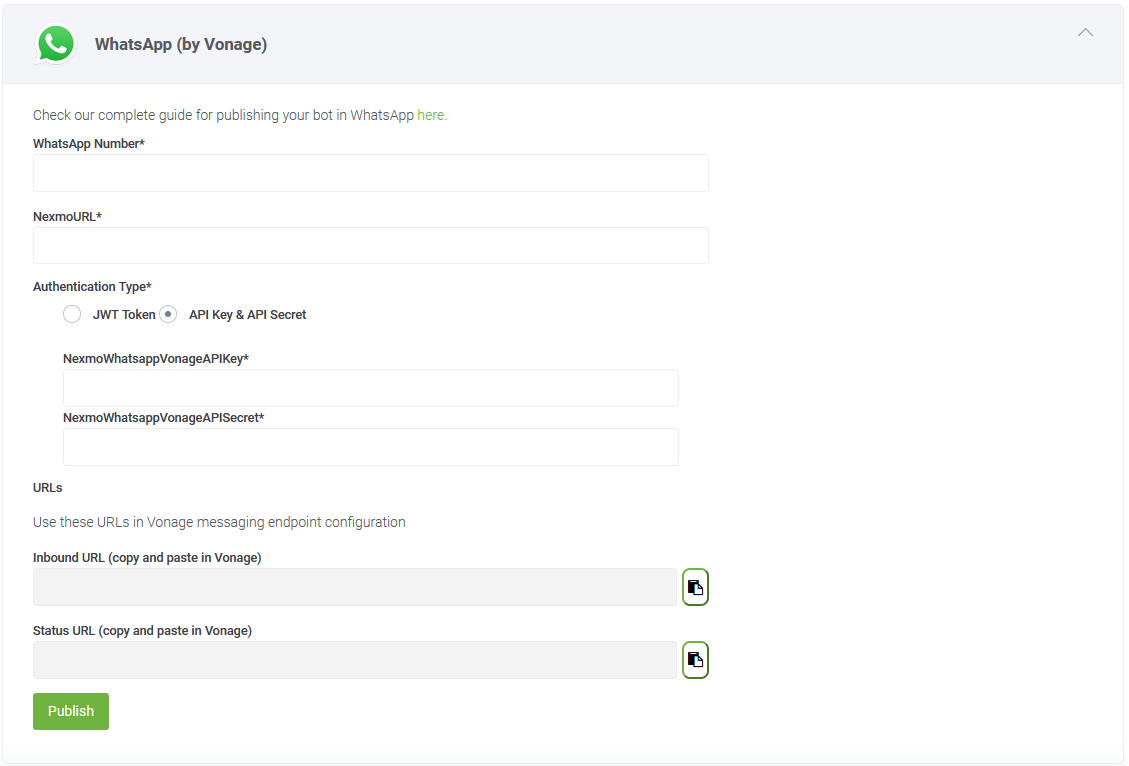
- Click the Channels tab, then search for WhatsApp and click on the WhatsApp by Vonage card.
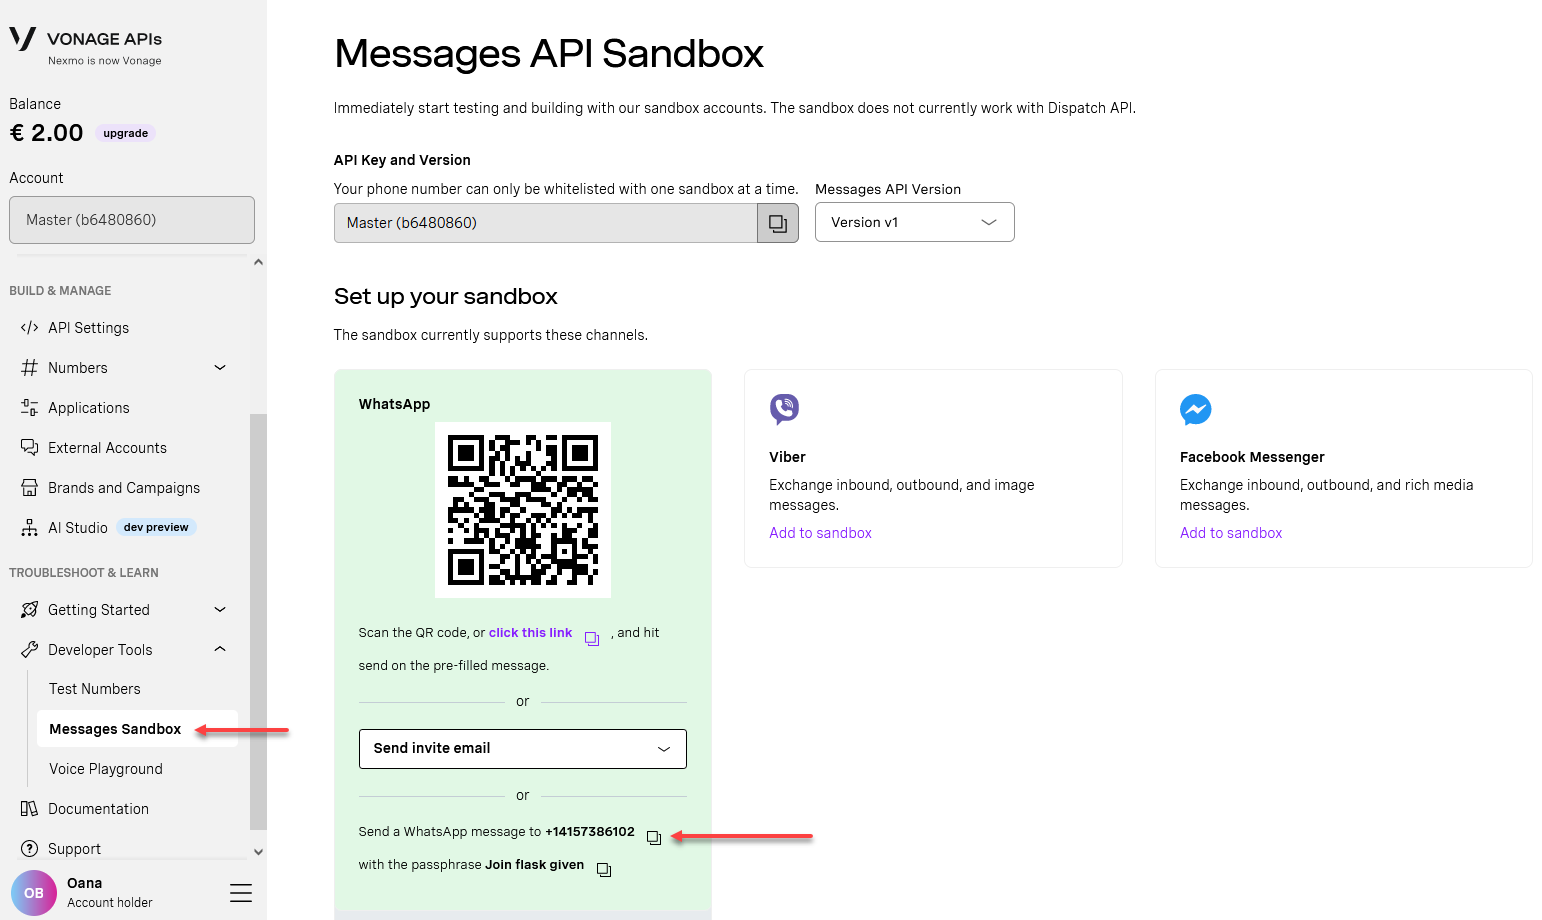
- In the WhatsappNumber field, enter the phone number associated with your Vonage account, without the “+”. To get the number, in the Vonage Dashboard, from the TROUBLESHOOT & LEARN > Developer Tools menu, click Messages Sandbox. Click the WhatsApp channel and copy the phone number.
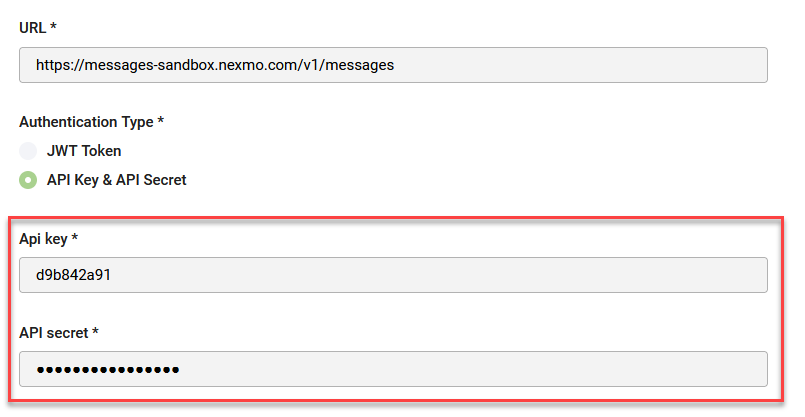
- In the URL field, enter the URL from your Vonage Dashboard:
- For Vonage production environments use https://api.nexmo.com/v1/messages
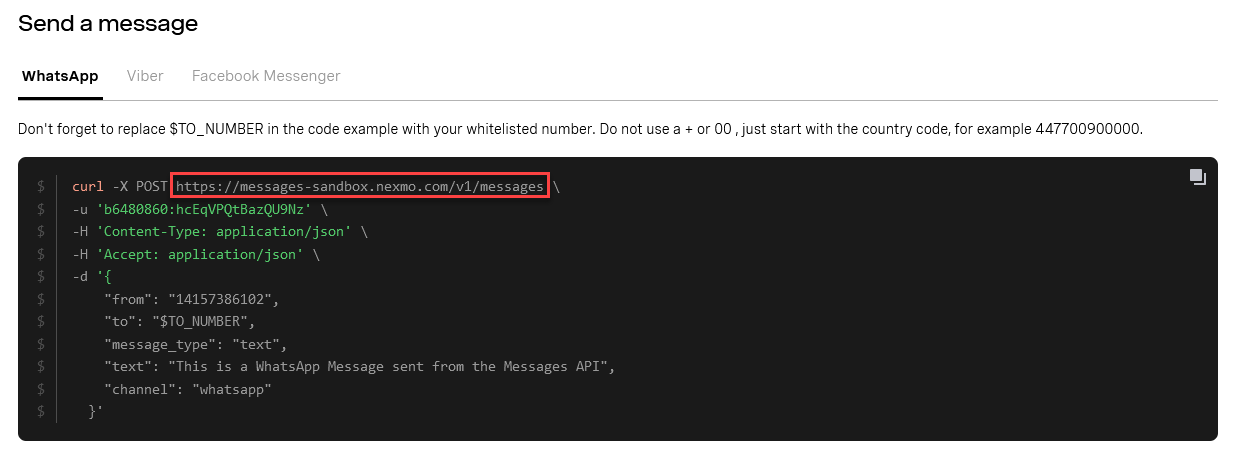
- For Vonage sandbox environments use https://messages-sandbox.nexmo.com/v1/messages
- Based on your Vonage account authentication method, select the Authentication Type and enter the required information as follows:
- If you have a JWT from Vonage, select JWT Token and in the JWT Token field, enter the JWT provided to you by Vonage.
- If you operate in a WhatsApp PROD environment using WhatsApp Messages API version v1, select JWT Token, and enter the generated token (Step 1.3.) into the VonageWhatsappJwtToken field.
- If you have an API key and secret, select API Key & API Secret and in the two fields which appear enter the API key and secret you got at Step 1.2.
- Optionally, customize channel display settings as follows:
- Alias: Enter a clear, business-friendly display name (e.g., Interactive Messaging). This value is stored in[[ChatUser]].ChannelDisplayName, which appears in reporting tools like AI Agent Summary dashboard - Engagement KPIs and can also be referenced in flow business logic.
- Description: Enter a brief description. This is particularly helpful when using an alias, as it helps identify the channel's specific purpose within the Druid Portal.
- Channel Icon: Upload a custom icon to display on the channel card within the Druid Portal.
- Click Publish to activate the channel. The channel activation might take up to 1 minute.
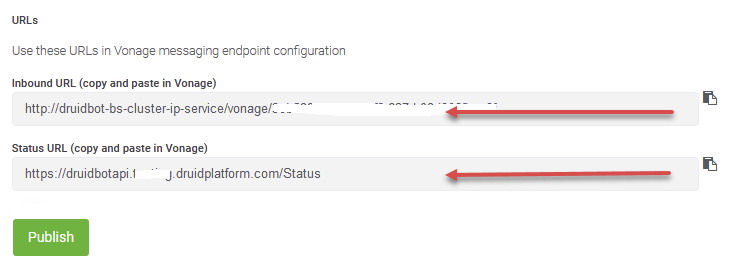
- When the channel activation completes, the Inbound URL and Status URL fields are automatically filled in. Copy the two values, you will need them at Step 3.
- Click Save & Close to save the WhatsApp channel configuration.

After the channel activates, the following fields are available in Druid:
- [[ChatUser]].ChannelId = "nexmo-whatsapp"
- [[ChatUser]].UserId - Stores the user's phone number.
- [[ChatUser]].ChannelDisplayName - Stores the Alias which is used in AI Agent Summary Dashboard > Engagement KPIs > Channel chart.
- [[ChatUser]].ChannelBotIdentifier - Stores the AI Agent number through which a user message arrived.
- [[HelpdeskClient]].PhoneNumber - Stores the user's phone number if the user engages with a helpdesk agent in a live chat. It will enable the agents to send WhatsApp Message Templates.
Step 3. Set up your Vonage account
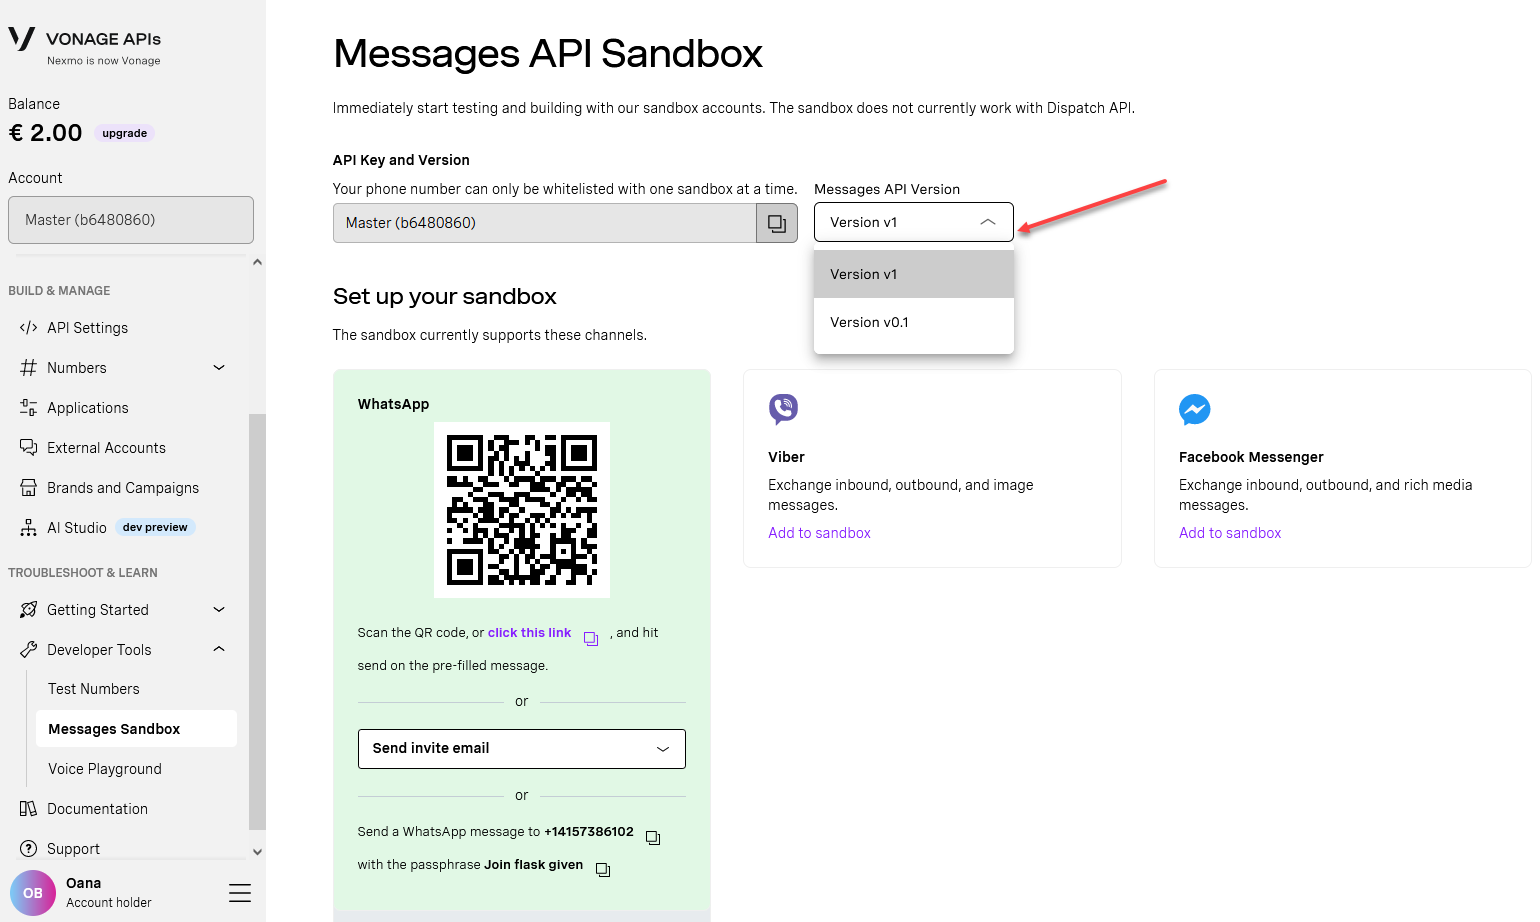
In the Vonage Dashboard, from the TROUBLESHOOT & LEARN menu, click Messages Sandbox.
From the Message API version drop-down, select the desired version.
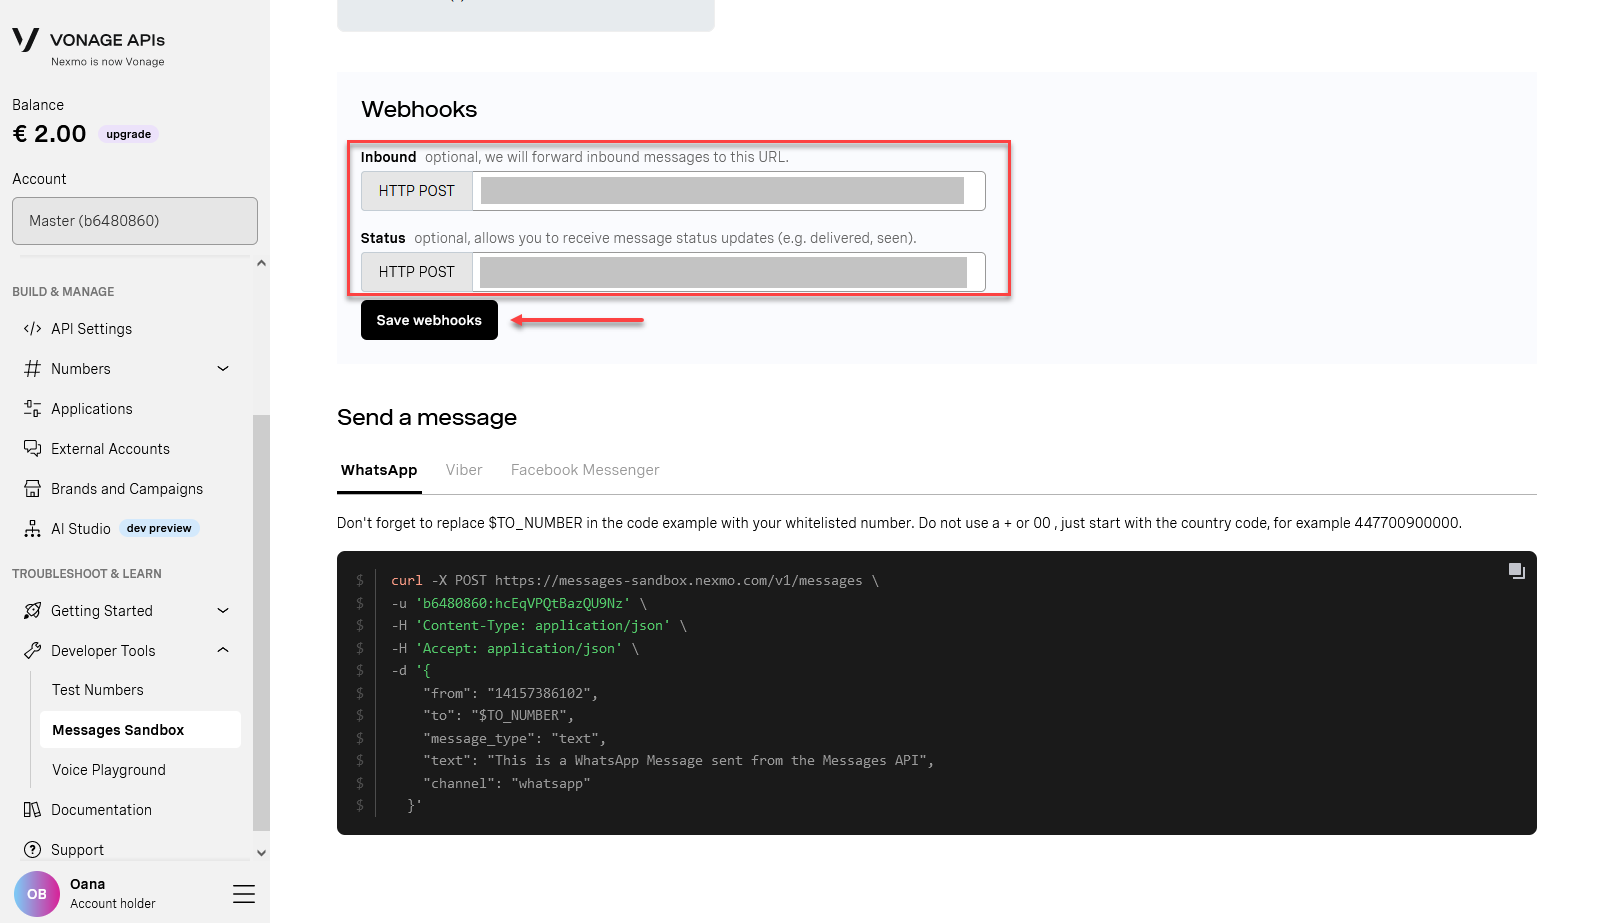
In the Webhooks section, enter the Druid endpoints copied at Step 2 and click the Save webhooks button.
You can now test the WhatsApp channel.
Step 4. Associate multiple phone numbers to the same AI Agent (optional)
Prerequisite: You need to have multiple accounts, each with an unique WhatsApp number. For more information on managing WhatsApp numbers, see Vonage documentation, section “WhatsApp Number Hosting”.
To associate multiple WhatsApp phone numbers to the same Vonage application, in Vonage developer portal, on the BUILD & MANAGE menu, click Applications and select the application you connected to the AI Agent. Click on the Link external accounts tab and link the desired accounts.
Step 5. Test the integration
You have two options to test the integration:
From Druid
To open the AI Agent in WhatsApp, in the Druid Portal, go to the AI Agent settings, click the Channels tab search for WhatsApp by Vonage and click on the card. In the modal clcik the channel icon on the left top. You can start talking to the AI Agent.
From Vonage
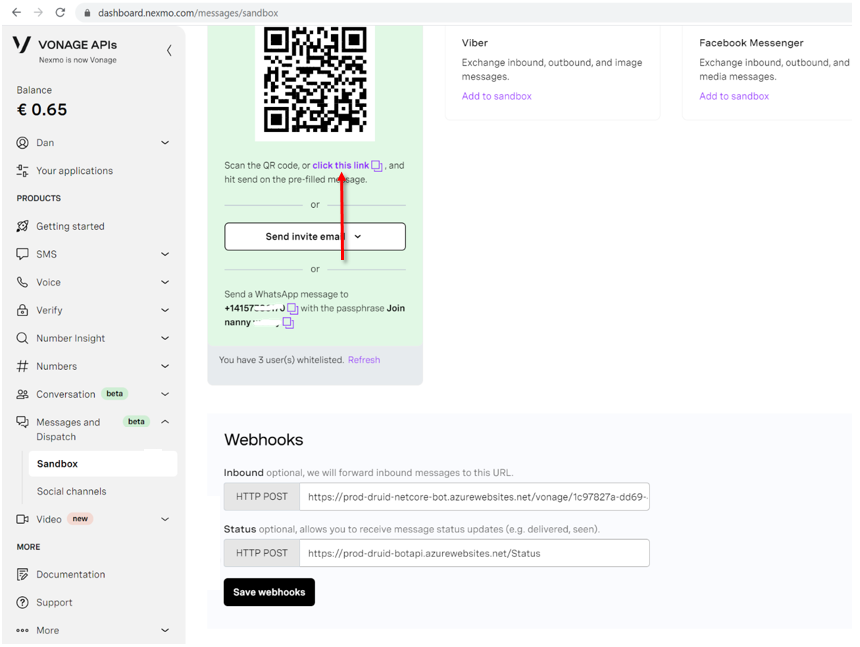
Return to Vonage Dashboard and click the WhatsApp link.
Follow the Web WhatsApp and send the passphrase message filled in automatically for you in the input area.
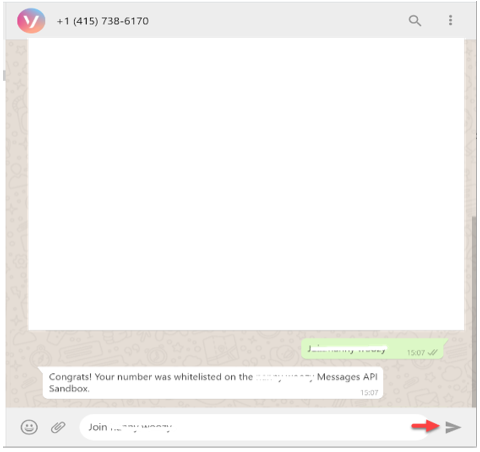
You are now connected with your AI Agent in the WhatsApp channel.
Receiving and processing voice messages
Druid supports audio messages only through Microsoft Cognitive Services and ElevenLabs. For Microsoft Cognitive Services, it supports all languages available in the Azure Speech Service. For a complete list of supported languages, refer to Language and Voice Support for the Speech Service.
Here's how it works:
- Receive audio messages. When a user sends an audio message via WhatsApp, the AI Agent will:
- Process the audio recording using Azure Speech/ElevenLabs resources configured in the channel settings.
- Recognize the language for Speech-To-Text (STT) based on the user's language ([[ChatUser]].Language).
- Log in the Conversation History the user message type as 'Audio Recording'.
- Process audio. The AI Agent:
- Converts the audio message to text using Microsoft Cognitive Services/ElevenLabs.
- Uses the converted text to predict the next conversational step.
- Respond. By default, the AI Agent will respond to voice messages with text. You can choose the AI Agent to reply with voice.
To enable voice messages support, follow these steps:
- In the channel configuration page, tap on Support voice messages.
- Select the Speech provider (either Azure or ElevenLabs), then enter the required details:
- For Azure, enter your MS Azure Speech API key and select the region.
- For ElevanLabs, enter your API key.
- By default, the AI Agent replies with text. To have the AI Agent respond with voice, toggle on Reply with voice messages.
- In the table, click the plus icon. A row is added to the table.
- From the Language drop-down, select the AI Agent language (default or additional) and from the Voice drop-down, select the human-like neural or standard voice the AI Agent will use to respond to the user.
- Click the Save icon displayed inline. You can add more languages and different voices per language as best suits your needs.
- Save the channel configuration.
Limitations
- When using a repeater with a hero button card, only the first five buttons are rendered. Any additional buttons beyond this limit are not displayed.
 Related Topics